Wednesday, 7 March 2012
Meeting with the Middletons
This afternoon I had a lovely meeting with Gren and Juliet, who own the Puppet Barge and are very kindly providing me with advice during the marionette carving process. It was the first time I had shown them the puppet and it was fantastic to see it spring to life in their expert hands. I came away with a lot of answers and suggestions to try regarding the design of the control and the way in which the marionette is hung on its strings, which I will implement before Emma, Asif and I meet for our next rehearsal over the weekend.
Monday, 5 March 2012
Blending
Good progress on Monkey Number Two, starting with the legs. The first step after cutting out the shapes on the bandsaw is to blend the four surfaces into each other, rounding off the hard edges. This is a nice job that doesn't require too much thought. It is also a bonus to have the first monkey to refer to, since the second one is a slightly scaled up version but the same design.
Here you can see the progression from left to right of the thigh through the blending process.

Here you can see the progression from left to right of the thigh through the blending process.

Sunday, 4 March 2012
Monkey attends first Baba Shakespeare rehearsal
This afternoon I took Monkey Number One along to rehearsal for the first time, and although the strings and control still need tweaking and the puppet needs to be decorated and the joints soldered, we were able to get a feel for how the monkeys will fit into Act One Scene Three and interact with the rest of the cast. Emma and I were delighted to meet our Monkey Wallah, Asif, and to begin working with him and to hear his suggestions as to what the monkey performance might entail. Just to explain, a monkey wallah is a man who earns his livelihood from busking with performing monkeys, and is a common sight in India. In Baba Shakespeare the monkey wallah appears with his two monkeys when the Buckinghams' car has broken down by the side of the road, and he wants them to pay for a performance, which they eventually agree to, despite being hard up themselves.
Our Monkey Wallah, Asif, has first-hand experience of monkeys, having had one as a pet, so we're confident he won't mind having puppet monkeys jumping on him, and will also be able to give us useful feedback about whether the marionettes are moving and behaving like real monkeys.
Emma, Asif and I will rehearse separately from the rest of the scene in order to devise our five to ten minute monkey performance, which will then slot into the main rehearsals, but it was important today to get an idea of how it will all fit together.
Saturday, 3 March 2012
Stringing the monkey
I want to get Monkey Number One on its strings today, to see how it works as a marionette and whether I need to make any alterations before I paint it. It's an exciting moment when the puppet comes to life for the first time and you begin to find out how it moves and see its character emerging.
Here is Monkey Number One admiring herself in the mirror for the first time. There is still work to be done (painting, adding ears, soldering the joints and so on) but it is encouraging to discover that all the work so far has been along the right lines and that the puppet does look and move like a monkey. I'm going to take her to a Baba Shakespeare rehearsal tomorrow to meet the cast and to walk through Act One Scene Three for the first time with Emma, who will be operating her, and Asif, our newly found Monkey Wallah.

Here is Monkey Number One admiring herself in the mirror for the first time. There is still work to be done (painting, adding ears, soldering the joints and so on) but it is encouraging to discover that all the work so far has been along the right lines and that the puppet does look and move like a monkey. I'm going to take her to a Baba Shakespeare rehearsal tomorrow to meet the cast and to walk through Act One Scene Three for the first time with Emma, who will be operating her, and Asif, our newly found Monkey Wallah.

Wednesday, 29 February 2012
Losing weight
Now comes the slightly scary step of hollowing out the head and torso in order to reduce the weight of the puppet. This involves splitting these parts in half with chisel and mallet, drilling out the middle sections and then sticking it all back together again with wood glue. This makes the puppet significantly lighter, which is good news for the puppeteer.
 |
| The head just after splitting in two |
 |
| Hollowing out the centre of the head |
 |
| Recovering post surgery |
 |
| Splitting the torso in half |
 |
| Torso before hollowing out |
Monday, 27 February 2012
The Birth of Monkey Number Two
Today I am cutting out all the pieces required for Monkey Number Two, which is going to be the slightly larger male monkey. It will be much quicker to carve this puppet, since it is essentially a scaled-up replica of the first, and I have already solved all the technical conundrums. Here is Monkey Number One (still to be named) reclining on the block of jelutong from which her companion will emerge. A curious mutation of the Genesis creation story!

I have found the enlargement function on my photocopier to be an invaluable tool for scaling up my original designs. These are then transferred on to the wood using carbon paper and tracing paper. It takes some thought to determine the configuration that makes best use of the wood.
A good few hours later, here are the bandsawed parts on the right, still very heavy and bulky but ready now to be carved.

Thursday, 23 February 2012
First Steps
Hurray! The feet are now attached to the legs, which makes a big difference to the monkeyness of the puppet. It's a beautiful day, so we've gone outside to try some first steps :o)
 |
| Standing, knees slightly bent |
 |
| Detail of feet |
 |
| Soles of feet |
 |
| Sitting posture |
 |
| Crawling posture |
 |
| Me and the monkey |
Monday, 20 February 2012
Carving the feet
Although the majority of the puppets are carved from jelutong, I am using lime for the hands and feet, as it is denser wood so should take the extra wear and tear from contact with the stage when walking or crawling. Having cut out the hands and feet this weekend on a bandsaw, this morning I have been working on the feet. Whilst carving, they are kept joined together so that it is easier to clamp them.
 |
| The cut out feet before starting to carve |
 |
| Sloping the toes down from the high points of the knuckles |
 |
| Defining the separate toes and knuckles |
Monday, 6 February 2012
The importance of not losing your head!

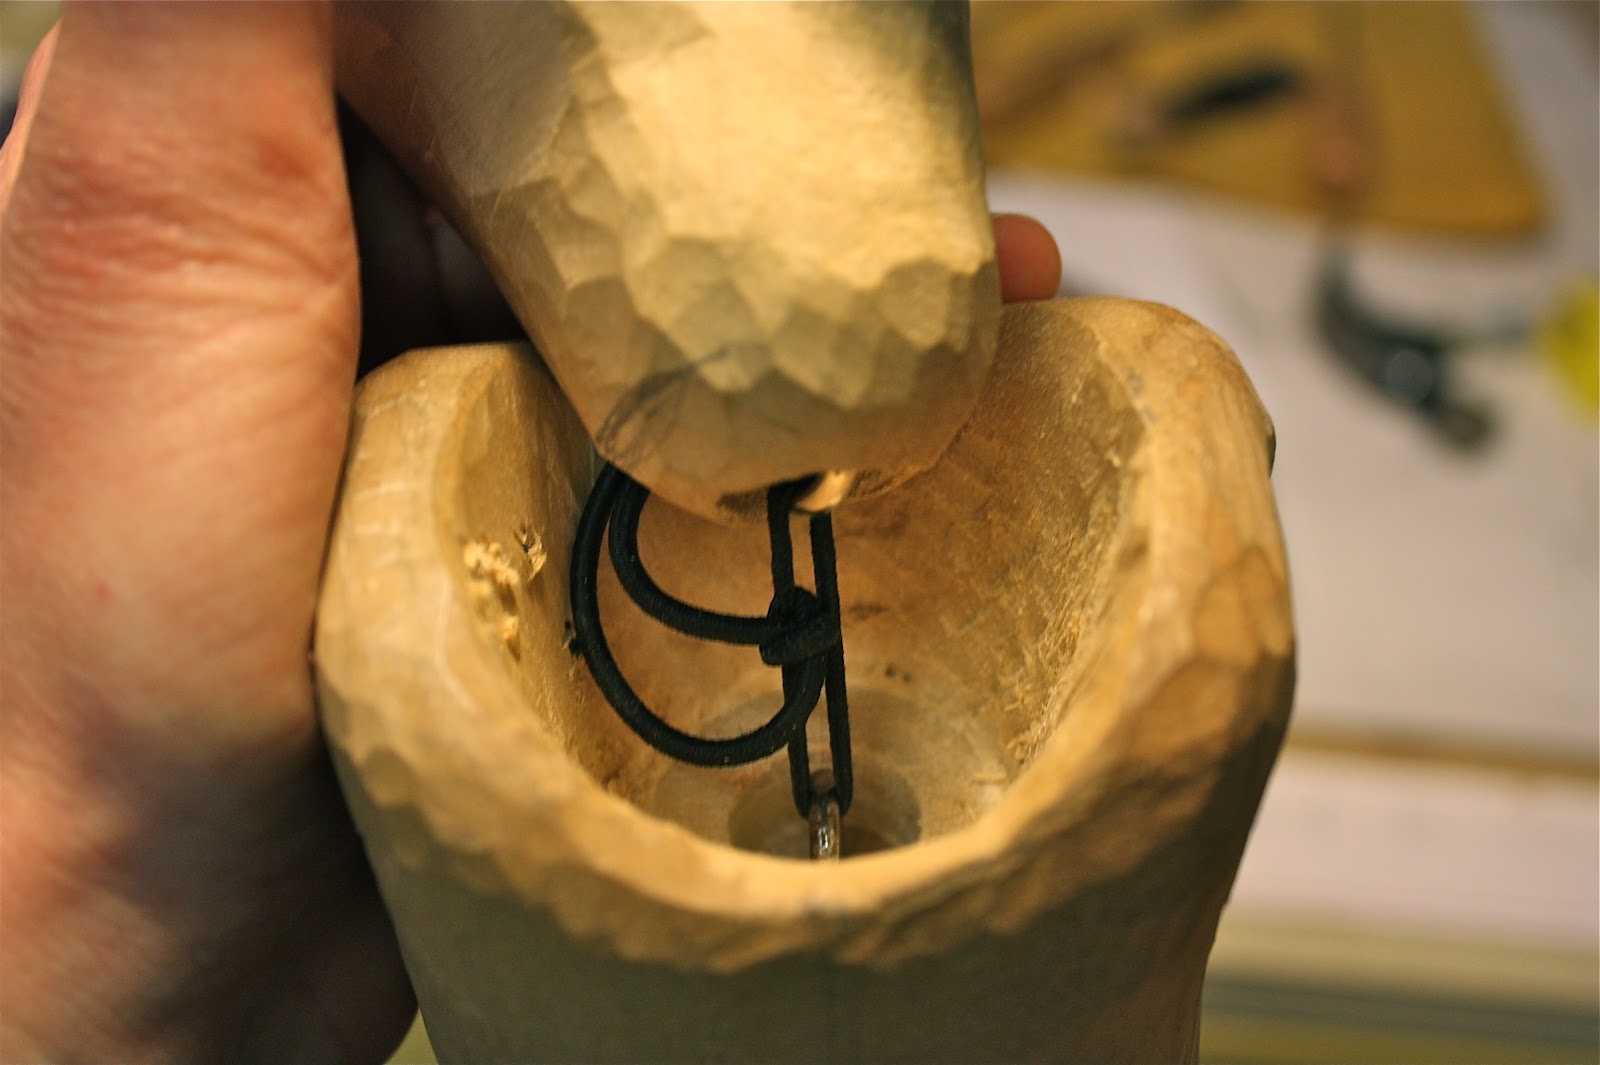
Here is the monkey a week later, with the right contours starting to emerge, the elbow and knee joints operational and the neck sitting nicely inside its socket within the torso and moving in the way I envisaged. That makes it sound easy! It is very much a cycle of trial and error, always balancing the form of the monkey against the functional requirements of each joint. Anyway, you can see from the photo below the socket in the top of the torso that the rounded neck sits in. The socket is pretty deep and the neck is correspondingly long. Why? Well it's so that when the monkey cranes its neck backwards or forwards you don't see a gaping big hole between the body and the head. There is a largish screw eye embedded into the neck and the bottom of the socket. They are embedded so that they don't protrude into the joint and stop the neck sitting at the bottom of the socket. I experimented with fastening a loop of wire between the two screw eyes, but the problem was that its rigidity didn't allow the neck to move enough within the socket to achieve the range of movement required. I found that strong elastic cord worked better, pulled tight and tied in a double knot. This is fine during the development of the puppet, but when it is finally assembled I think the elastic will need to be sewn or glued or both so that the head doesn't fall off during the show! A big no no! Apparently though some Chinese marionettes don't actually have the heads fixed to the bodies, and they just rely on gravity to keep them sitting in their sockets. Hmm. Tempting, but these monkeys will be rather athletic and may even do handstands, so yes, we will need elastic.

Monday, 30 January 2012

Sunday, 29 January 2012
Taking shape
Gradually the monkey is emerging and taking shape. It's great to get into the carving, accompanied by Rachmaninov's 3rd piano concerto, which helps me get into the flow. Here is progress so far on the head. The ears are going to be made separately and glued on at the end. The eyes will be hollow sockets. At the moment the head is still slightly square, so needs to be rounded off further. I'm also contemplating how to tackle the tufty sideburns that rhesus macaques monkeys often have.


Here is the left leg, also needing more rounding, but I will do this once the knee joint has taken shape. I'm working simultaneously on the torso, legs and head, so that I can fine tune how the joints fit together. Since monkeys rarely stand fully upright, I am designing the knees so that the legs do not straighten up completely.

Thursday, 19 January 2012
Inside the Arcola Tent
Today Emma and I paid a visit to the Arcola Tent, which is where Baba Shakespeare will be performed in the spring. Emma and I will be operating the monkey marionettes, and we wanted to get a feel for the space and what we can achieve within it. It was exciting to get in there and see what it is like. We took Junkie Monkey so that we could experiment with a puppet and try out some initial ideas for the performance.


Monday, 16 January 2012
Chop Chop!
It is time for me to cut out my designs on a bandsaw. First the front and side elevations are transferred onto the wood, which has been squared up using a plane. Below you can see the right lower leg under the pillar drill. The holes for the joints are drilled whilst the wood is still square, which makes it much easier to get them nice and straight.

Below is the female monkey in a very primitive state, with all the wood still around the drawings. Before bandsaws were around, this excess wood had to be removed by hand with a large chisel, but now this can be done faster and more accurately with a machine. The wood here is jelutong; the hands and feet will be made later on out of lime.

Here is some bandsawing going on. The trick is to cut out the first side of the design but not all the way round; if you leave tiny sections still attached, then the wood doesn't come off, which means you can turn the block over to cut out the second side and the base of the wood is still flat. At the end you can go back and remove the wood around the first elevation using the bandsaw or a coping saw.

Here is the monkey post bandsaw, still looking a little strange but that will soon change once I start carving and the hard edges get taken off.

Thursday, 12 January 2012
Junkie monkey finding her feet
Late last night I finished junkie monkey. Here is a 3 minute video of her trying out some moves on the kitchen table. It's lovely when you first finish a puppet, however rough, and get to bring it to life for the first time.
I'm pleased with the range of movements I can get with this marionette: standing, crawling and sitting. Ideally the knee joints would be a bit looser, but it's definitely helpful to have a rough puppet to play with while we try out ideas for the show. The control is an upright one normally used for human marionettes (animals tend to have horizontal controls). Although the monkeys will probably need to crawl as well as sit and stand, because they are performing monkeys I think they will spend more time upright, so it is likely that the controls will a slightly modified version of the upright control.
I'm pleased with the range of movements I can get with this marionette: standing, crawling and sitting. Ideally the knee joints would be a bit looser, but it's definitely helpful to have a rough puppet to play with while we try out ideas for the show. The control is an upright one normally used for human marionettes (animals tend to have horizontal controls). Although the monkeys will probably need to crawl as well as sit and stand, because they are performing monkeys I think they will spend more time upright, so it is likely that the controls will a slightly modified version of the upright control.
Tuesday, 10 January 2012
Junkie Monkey
This evening I got the urge to make a quick monkey marionette out of stuff from my junk box, to be finished tomorrow evening. This will give us something to play with when trying out ideas for the puppetry sequence in Baba Shakespeare. Even when making a puppet out of these kind of materials, care still needs to be taken over the way the joints are made, so that it moves as realistically as possible. The beads inside are not to show what this monkey has been eating for dinner (they may look like nuts but in fact they are wooden beads!) but to add weight to the body so that it has a similar feel to a wooden marionette. She looks a bit glum but will probably cheer up when she gets her paws :o) For now she's just chilling out sitting in my basket of beads.


Saturday, 7 January 2012
Planing the wood
It is important to plane the blocks for two reasons: firstly so that all the faces are flat and perpendicular to each other, which is important when cutting out the designs on a bandsaw, and secondly so that the dirty surface of the wood is removed. It is not good for your chisels to cut through gunk and grime. This is also why planing the wood is better than sanding it flat. Sandpaper leaves lots of grit on the wood, which would have to be brushed off before starting to carve.


Thursday, 5 January 2012
The first cut
My father's favourite maxim is "measure twice, cut once", and with his advice ringing in my ears, I have spent quite a lot of time considering & reconsidering the design. Now that I feel satisfied with my drawings, it is time to saw some blocks of those great big planks of wood.


Of course, it would be quicker to use a bandsaw, but in the absence of such a luxury I have resorted to the good old handsaw. Plus it's a quick way to warm up in a cold workshop!
Tuesday, 3 January 2012
Scaling up to full height
The photocopier came into its own today when it came to scaling up my original paper design. At full standing height this measured 16.5 inches. My first enlargement attempt did not reach the full 20 inches I was aiming for, but it was a case of third time lucky, so now I have the side elevation at the correct scale for the female monkey, plus two redundant smaller versions.


Subscribe to:
Posts (Atom)